|
|
 |
|
|
|
|
|
| Introduction
This page has been set up to hold all sorts of information about braking. It's important and informative to consider the first 2 sections, where we compare braking distances and braking times. It might surprise you to learn that most driver decisions are time rather than distance based. Much road safety thinking concentrates on braking distance, and tends to draw false conclusions as a result. We go on to introduce the "safe braking zone", which is an important component of being able to drive at a "safe speed". Further down we explore the subject of braking and explain some advanced braking techniques. |
||
| Braking distance
Looking at braking distances is very conventional. Braking distances appear in the Highway Code and UK drivers are expected to learn them. It's well known, perhaps even obvious, that braking distances increase with the square of speed. This is often used to point out the extra danger that might be present at higher speeds. But all is not entirely as it seems. There's more than one way to look at braking, and the way that braking distance changes with speed is only one of them. Figure 1 (below) shows three traces for braking at maximum effort from 60 mph. The red trace for speed is the most conventional view, and shows that half way through braking from 60 mph by distance we are still travelling at 40 mph. The blue trace shows how kinetic energy (KE) changes with distance. KE is shown in "arbitrary units" normalised to 60. Half way through the braking distance half the kinetic energy has gone. The yellow trace shows fatality risk. It's also normalised to 60 mph = 60. The actual fatality risk suffered by a car driver in a 60 mph impact is about 0.5 or 50%. (it's a rule of thumb calculation based on the work of Hans Joksch - reference below) And half way through our braking distance the fatality risk has reduced by 90%.
|
||
| Braking time
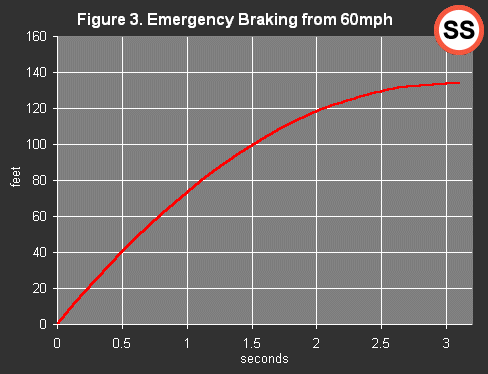
A more driver oriented view of braking is to look at braking time. It isn't normal in driving to make judgements in feet. Mostly judgements are based on how long it will take to get there, or how long it will take us to stop. The curves in this case are somewhat more favourable. The way speed changes with time shows how drivers are able to judge "stopping distances" on the road with comparative ease. They soon learn that brakes shed speed at a constant rate. Full panic braking for example sheds about 20 mph per second. There's no funny square law here. It's a straight linear relationship. That's the red trace in figure 2. Kinetic energy (KE) is shed faster at first (because it varies with the square of speed) and we can see that after half the braking period only 1/4 of the kinetic energy remains. Similarly, after half the braking time the fatality risk is only a couple of percent of its original level. Notice how the kinetic energy halves in the first 0.8 seconds, and the driver fatality risk halves with just 0.25 seconds of braking. (like figure 1 above both KE and fatality risk have been normalised to 60 mph = 60. This helps to show how these important parameters vary together.)
|
||
| An oddity
While we were working on this page we happened to look at this unusual graph of time against distance. We've not sure what it offers, but have included it for completeness.
|
||
| Curve families
Figures 4 and 5 show braking curve families starting from different speeds and showing the distance (fig 4) and time (fig 5). It's again notable that the time based view is linear and easy for drivers to judge.
|
||
 |
||
| Measuring braking
It's always useful to be able to define something in numerical terms. The best unit for measuring braking effort is "g", where the braking force is compared to the force of gravity. You might know that an object falling is accelerated by gravity at a rate of 32 feet per second per second or 9.8 m/s². A modern road car with good brakes and tyres approaches the same sort of figure. Deceleration or braking can sensibly be expressed as negative acceleration. So when we say a braking effort of 0.9g we mean a deceleration of (0.9*32) 28.8 feet per second per second. In more familiar units we could say that braking at 0.9g causes us to lose speed at about 20 mph every second. All the emergency braking graphs on this page assume a braking effort of 0.9g. |
||
| Normal braking
It wouldn't be pleasant driving around if every time we used the brakes we carried out an emergency stop. It follows that drivers plan to use their brakes more moderately and only resort to emergency stops in, well, emergencies. If you base all your planning as a driver on using the brakes to a maximum of say 0.45g (i.e. half the maximum) it follows that you will always have a substantial margin for error. If you make a mistake, or if something tends to obstruct your path, you have the option of braking harder and stopping shorter. There are all sorts of ways that you could incorporate safety margins in your driving plans, but if you never plan to brake really hard you will always have a decent safety margin; i.e. you always have the option of braking harder. new There's a big potential problem if drivers try to base their safe speed choices on emergency braking. With long time and mileage intervals between emergency braking events, the brain gets no confirmation of the judgements required. This could potentially lead to significant speed choice errors, and when an emergency was required, only then would the driver discover that his brakes didn't meet the imagined standard. But if we base our safe speeds and our braking plans on the more modest 0.45g figure, every planned use of the brakes confirms that the brain is "correctly calibrated". |
||
| Safe Braking Zone
A vital component of being able to set a safe speed is having knowledge of your stopping ability. This is where we introduce the "normal braking" discussed above to create an extra safety margin in all our driving. We choose our speed so that we can stop comfortably on our own side of the road within the distance that we know to be clear. See we chose the word "comfortably"? In this context we suggest that means by braking at 0.45g... i.e. half the expected maximum braking effort in the dry. We should express the safe braking zone in seconds and allow for 0.75 seconds of thinking time. We base the size of the zone on the point where we will be if we don't brake. This is simply because we won't normally be braking. So for example, if we are travelling at 60 mph and we look at the point where we will be in about 3.8 seconds, we will be looking at the point where we would stop if we have to then decide to brake. Actual braking takes 6.8 seconds. The difference is because on average we are covering the same distance more slowly when we brake. Refer to the graph below (figure 6). This graph shows how the size of our safe braking zone changes with speed. Notice how, even at 100 mph we only need to know that we have a clear space for less than 6 seconds ahead. Contrast this with figure 7 below which shows the safe braking zone for emergency braking at 0.9g.
|
||
| Emergency braking
If the unexpected happens we always retain the option of emergency braking. The graph below shows the size of the safe braking zone in seconds from various speeds when braking at 0.9g is used. Look at the example of 60 mph. At 60 mph the point ahead where we will come to rest is 2.3 seconds away. (In figure 6 above the same speed shows a safe braking zone of 3.8 seconds. We had an automatic 1.5 second extra safety margin. Actually braking will double that margin to 3 seconds because the average speed during the braking period is half of the average speed if we had continued.)
When we carry out emergency braking on the road it's a sign of serious safety systems failure. In fact if you carry out emergency braking more than once a year, you're probably making dangerous mistakes. Once a decade or less is a worthy aim. In the dry, with or without ABS, the fastest way to stop is usually to press the brake pedal as hard as you can and hold it there. Sometimes steering control is even more important than braking and locked wheels don't steer. If you must have steering control during emergency braking and you don't have ABS then releasing the brake pedal is required. You have just started "cadence braking". |
||
| Cadence braking
Cadence braking is a valuable emergency technique where you pump the brake pedal on and off rhythmically. (Cadence means: "with rhythm"). There are two primary advantages to cadence braking. The first is that you swap between braking and steering control. When the brake pedal is down, you have full braking and when it's up you have full steering. The second if that you keep passing through the point of maximum braking effort; i.e. the point where the wheels are not quite locked. Cadence braking is taught on skid pan courses and has the potential to save your life. This alone is easily sufficient reason to get some skid pan training. Once learned it's never forgotten and is equivalent to upgrading the braking performance of every non-abs car you will ever drive. Cadence braking is not required in ABS equipped vehicles. |
||
| Avoidance braking
A little know variation on the cadence braking idea involves arranging to get the maximum steering effort to avoid an obstacle while under emergency braking. Firstly you plant the brake and clutch together. While you're slowing you assess any possible escape route from the obstruction ahead. Once you have decided on your escape plan you apply about 1/4 turn of steering in the direction of the escape route. This steering has no effect because your wheels are still locked from the braking. The longer you can stay like this the more speed you will get rid of. With the 1/4 turn of steering still applied, and fairly late in the whole event you release the brake pedal. As you release the brake the steering takes over and you get a very strong steering action in the direction of safety. This is not something you can expect to learn on public roads, but is taught on better skid pan courses. For some reason Paul Ripley in his recent book "Expert Driving" calls this technique "interference braking"; we don't know where he got that from! |
||
| Threshold braking
We discussed briefly above that maximum theoretical braking effort is obtained just before the point of wheel lock. Threshold braking is the subtle driver technique which attempts to approach this ideal as closely as possible. It will involve great sensitivity on the brake pedal. Thin soled shoes are a significant advantage. But knowing when wheels start to lock is more of a mystery. How can a driver know from the driving seat that wheels are close to locking? We've never seen this in print anywhere, but we believe that the messages arrive through the steering wheel. As the front wheels tend to lock small tugs can be felt through the wheel actually pulling away from the locking road wheel. When these tugs are felt is the right time to ease off the brake pedal a fraction and stay at the threshold without exceeding it. You're unlikely to be able to learn effective threshold braking on the road. On the skid pan it is possible, but things tend to be rather gentle and the maximum braking force is pretty small in the slippery conditions of a skid pan. A better option is to learn threshold braking under instruction on a race circuit. ABS provides a close approximation of threshold braking, and in an ABS equipped vehicle you might as well normally plant the brake pedal and leave it to the electronics. That said, good threshold braking is better than ABS and can stop you shorter. However, although it is possible to threshold brake in an ABS equipped car, sometimes the ABS will interfere with the subtle steering messages and actually make threshold braking harder. |
||
| new
Braking and slip
Maximum braking force is normally generated
when the tyres are starting to skid. This tendency to skid is technically
known as "slip" and can vary from 0 to 100%. See figure 8 below. On dry
tarmac, maximum braking force is generated with about 5% to 15% slip. Once
past the maximum braking force peak, wheel lock occurs quite quickly -
note how road grip reduces while input to the brake remains (probably)
constant. Imagine there's just enough brake effort to get past the peak
- now as the slip increases the road grip reduces and the brake effort
overcomes the remaining tyre grip ever more easily.
Typical friction characteristics: (a) dry asphalt; (b) wet asphalt; (c) gravel; and (d) packed snow. The graph shown is adapted from the following technical report: Non linear Dynamics of Vehicle Traction (B Olson et al) (click here), which provides much detail and analysis regarding tyre slip under braking and acceleration. |
||
| Braking and weight transfer
Under very hard braking the front wheels of a typical road car are providing around 70% of the braking effort. This is because the grip of the tyres is proportional to the weight acting on them and because the vehicle's weight is thrown forwards by braking. In many cars this forwards weight transfer compresses the front springs. Some modern vehicles include "anti-dive geometry" in the front suspension to reduce or eliminate the effect. Anti dive works because the front suspension effective pivot point is positioned above and behind the front wheels. The exact pivot point is chosen to produce a force which tends to make the vehicle "climb over" the front wheels under braking as an equal and opposite force to the weight transfer that causes dive. |
||
| Braking and cornering
It's often been said: "never brake in a bend". That so-called advice is dangerous nonsense and you must forget it right now and forever. While braking in a bend can have serious consequences the failure to brake when necessary has more serious consequences still. But where did the idea "never brake in a bend" come from? And does it hold a grain of truth? For the sake of illustration, let's assume you are cornering near the limit of grip on a track. There's significant weight transfer to the "outside" wheels. Something happens and you start to apply the brakes. As weight is transferred forwards the grip limit of the outside front wheel is exceeded and the weight on the outside rear wheel is reduced. The loss of grip promoting weight at the rear may well cause the rear of the vehicle to break away in an "oversteer" slide. At this point you will need fast reactions and not a little talent to gather it up before impact with the scenery. Braking in a bend is likely to produce these major dramas when available grip is exceeded. But for normal road driving there should be a substantial margin of cornering grip available. In the same way that we recommend above never planning to exceed half braking effort we also recommend never planning to exceed about half cornering effort. In such cases you have the option of braking moderately hard without exceeding available grip for braking and cornering together. If you are driving so that you can stop safely on your own side of the road in the distance that you know to be clear, you must be able to brake in a bend. Any alternative view would force us to conclude that you could NOT stop within the distance that you knew to be clear, and all cornering would be inherently unsafe. So to summarise:
|
||
| Trail braking
While the general rule for road driving involves separating braking and cornering there is a notable exception called trail braking. Trail braking is originally a racing drivers' technique and describes continuing to brake as your turn into a bend. When applied with suitable skill this method confers some significant advantages:
Trail braking is a difficult and subtle technique. It is dangerous to try to learn it on the public road. If you brake too hard or at the wrong time, trail braking can (and does!) easily cause a spin. The only way to learn trail braking is under instruction on a circuit or on a proving ground. |
||
| Progressive braking and
feathering off
When you brake (as we saw above) weight transfer takes place, and this weight transfer tends to compress the front suspension. It's part of the smooth drivers job to allow this energy to flow smoothly into and out of the front suspension springs. We do this by gradually increasing braking force at the start of braking and gradually reducing braking force at the end of braking. The weight transfer energy is allowed to flow in and out of the suspension springs slowly. This also greatly aids comfort, and assists vehicle stability. For a simple example, remember that nasty jolt that new drivers get when they brake to rest and stop with the brakes firmly applied? As the vehicle stops, so does the weight transfer and the front springs give up their stored energy suddenly. One soon learns that it's better to gradually reduce braking as you come to a stop. This releases the energy stored in the front springs gradually over the last few miles per hour lost. It's this gradual release of brake pedal pressure which is known as feathering off. |
||
| Hot brakes and warped discs
When you brake what's actually happening is that the vehicle's kinetic energy is being converted to heat in the brakes. It's a lot of kinetic energy and it makes a lot of heat. It follows that repeated applications of the brakes from speed (for example 70 stop 70 stop 70 stop) might make them unusually hot. If the brakes get too hot they lose efficiency. You have to press the pedal harder for the same braking effort. In extreme examples the brakes may not seem to work at all. It follows that you should be aware of the risk of increasing brake temperatures beyond safe levels. If they seem to become inefficient, then you must reduce speed and allow time for the brakes to cool. You're more likely to experience this on a circuit than on the road, but some vehicles will suffer serious brake fade if driven with enthusiasm on a road with fast straights and slow bends. (Or indeed in any circumstances which call for repeated braking.) Brakes are operated by a hydraulic system. This means that the force from the pedal is transmitted by a fluid (brake fluid) from the pedal to the wheels. Excessive heat can cause the brake fluid to boil and the pipes fill with gas. Since the gas is much more compressible than the fluid it becomes impossible to transmit the force from the pedal to the brakes. This gives the impression of a total brake failure. Brake fluid tends to absorb water from the atmosphere. (Fluids that absorb water in this way are described as hygroscopic.) As time passes the brake fluid will absorb more and more water. Unfortunately the more water that is absorbed the lower the boiling point of the brake fluid becomes. When the fluid does boil, most of the gas is steam from the absorbed water. For this reason brake fluid replacement is recommended by motor manufacturers every two years or so. You should also keep spare brake fluid tightly capped. If it's been left open, throw it away. Coming to rest with hot brakes brings a risk of warping the brake discs. One thing that hugely increases the risk of warping is to be stationary with your foot on the brake when they are very hot. On the track, do a few cool down laps before you stop. On the road if you come to a temporary halt with hot brakes do not sit there with your foot on the brake pedal. In general it's best to allow the brakes to cool before stopping. |
||
| Electronic assistance
More and more cars are now fitted with more and more sophisticated brake improvement electronics. If you are new to an electronic assistance device you should "try it out" in safe conditions to be sure that it won't surprise you when you need it most. You should make sure you are aware of what electronics is fitted and what the likely effects might be every time you get into a different vehicle. Consult the manufacturer's handbook. You might find systems like "Emergency Brake Assist", and "Cornering Brake Control" in addition to ABS. ABS is a system where wheel sensors detect the onset of wheel lock and reduce brake pressure to the wheel as it begins to lock. The primary advantage of this system is that steering control is retained at all times. ABS will not stop you shorter. On occasion ABS can lead to strange effects. If you have to carry out emergency braking while cornering hard the braking effort soon breaks traction and the brakes are strangely ineffective due to available tyre grip being used for cornering forces. When ABS functions a pulsing will be felt through the brake pedal. In some cases this has surprised drivers into releasing the brakes. The moral is that you must know your vehicle. You should not be getting surprises just when you need all the braking force. In freshly fallen snow and on gravel ABS increases stopping distances. |
||
| Two foot panic
When driving a manual car and emergency braking is considered the question arises about what you might do with the clutch pedal. Some have suggested that leaving the clutch alone is a good idea until just before you stop. They are wrong. In an emergency hit the brake and clutch both at once in a "two foot panic". This is important for two basic reasons:
|
||
| You go where you look
Sometimes braking isn't the only escape from a dangerous situation ahead. Sometimes it's better, safer and more effective to steer around an obstruction. We've looked at various methods of retaining steering control during periods of braking, but none of these are any use if you're frozen on the brake and are sliding straight to the scene of the accident. Amongst advanced driving circles it's well known that "you go where you look". If you panic you might freeze on the brakes and focus all your attention on the object you are about to hit. Unless you look away to a safe space you are unlikely to release the brake and start steering to safety. The trick is to train yourself to always look for an escape route even before you encounter the danger. If you're always looking for clear space you're much less likely to "freeze" and "forget" to look away from the obstruction. |
||
| Braking in the real world
Naturally adjusting your speed or position on the road where there are other road users may have an impact on their plans. Normally before braking you should check your mirror for anyone behind who might be affected. If there is someone close behind, then it is sensible and prudent to start braking earlier to give them more time. Another thing to consider is how your braking looks to other road users. Take this example: You are approaching a T junction on the minor road and you're driving in a highly enthusiastic manner. You know that traffic on the main road will cause you to brake to a standstill, but you leave the braking late and brake hard, because you know you can stop precisely at the give way line. But approaching on the main road is an unskilled occasional driver. As they see you roaring towards your give way line, they erroneously form the opinion that you will not be able to stop in time and they swerve into the path of oncoming traffic. In this way your braking could have a major effect on others' safety, and it's important to be sure that other road users will not panic when they see you driving. If there's a full blown emergency ahead, hit the brake first and hit it hard. Don't check the mirror. You should already have a good awareness of what's behind, but even if you don't then you must deal with the emergency ahead first. When there is an emergency ahead, it's good general practice to brake first. During the period of braking you should be considering other escape options (for example steering around an obstruction). By braking first, perhaps instinctively, your give yourself time to think and plan, while also dumping speed and kinetic energy. If you do decide on a different course of action, then by braking first you will have more time and less remaining kinetic energy to deal with. |
||
| Training
You may have been surprised by some of the information on this page, and just how much you can learn about braking. Braking is just one of a range of topics within the subject of driving where there's always something new to learn. Getting extra training, perhaps from the IAM, RoADA or any of the better private courses will help you to understand many advanced topics and can make you safer on the road. Every vehicle you ever drive will be upgraded. And it might save your life. |
||
Braking calculator
|
||
| Comments
Comments on the above are welcome. If there is a demand we will create a comments page. We will be delighted to publish all suitable emails including those whose content we disagree with. Email comment. |
Clear thinking about safe driving for the 21st century
|
|
|
SafeSpeed ©
2003 all rights reserved
First published 12/03/03. Last amended 10/11/03. |